
My daughter is moving into her off-campus apartment this year. During our many (very many!) shopping trips, we kept seeing welcome mats with cute designs. She decided she wanted a personalized doormat for her apartment door entry. Time to DIY!
I have been really trying to craft with my Cricut machine more this past year. Crafting your own, personalized doormat is the perfect project to do by yourself or together with your kids!
The following tutorial uses a cutting machine. If you do not own a cutting machine, you can buy a stencil or make one by printing and cutting your design with a craft knife. If you are interested in purchasing a cutting machine, I highly recommend the Cricut Maker or Cricut Explore Air. See the end of this post for some current deals.
DIY Personalized Doormat
Supplies
Please Note: This post may contain some affiliate links for your convenience (which means if you make a purchase after clicking a link, I will earn a small commission). This helps keep my blog up and running at no additional cost to you.
- Blank Doormat
- Measuring Tape
- Cricut
- 12 x 24 Cricut Mat
- Cricut EasyPress 2 or Iron
- Outdoor Acrylic Multi-Surface Paint
- Stiff Paint or Stencil Brushes
- Freezer Paper
Instructions
Step 1 – Measure
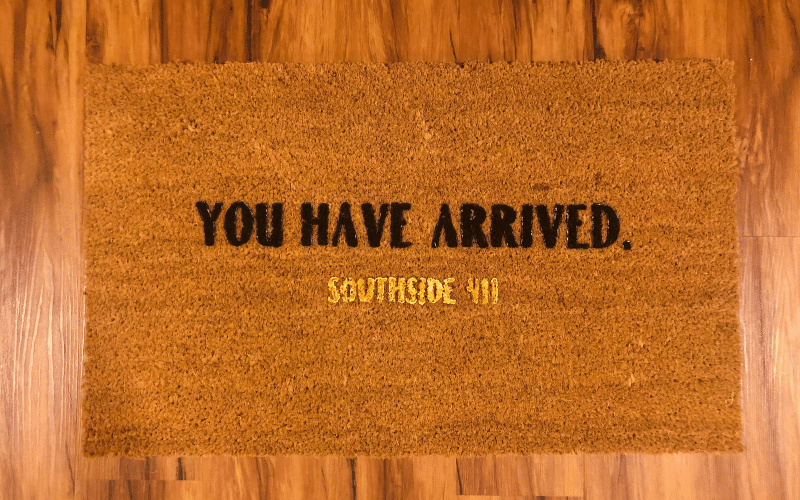
- Measure your doormat. The mat we used and linked above is 18” x 30”.
Step 2 – Design
- Using Design Space, add your text boxes with your text and desired fonts. Cricut has great tutorials on using Design Space.
- Size your design so that it fits your mat well.
Step 3 – Cut
- After you hit the “Make It” button in Design Space, you will see how your design will be cut on the mat. Make sure the design is in the middle of the mat before you start cutting (you can select the whole design and move it).
- Place freezer paper, shiny side down, onto the mat. There is no need to mirror the image.
- Load your mat, set your material, and let the machine cut.
- Unload the mat and weed your design, making sure to leave the little pieces in letters such as ‘O’ and ‘D’.
Step 4 – Apply
- Carefully peel the freezer paper off the mat and lay it onto the blank doormat. Make sure you have all of those loose pieces in the center of the letters are placed properly.
- Heat the EasyPress 2 (or iron) and adhere down your freezer paper section by section. This step will help keep the stencil on the doormat while painting.
Step 5 – Paint
- Now you are ready to paint! Remember to keep your brush vertical and use up and down motions.
- When done, carefully remove the freezer paper.
- Go over any areas that you think need more pant.
- Allow the doormat to dry overnight.
Final Tips
- I am not sure why but we had a tough time finding freezer paper! We went to three stores before we found it at Target.
- I only had a Standard Grip 12 x 24 mat but I think the LightGrip would have been easier to work with since it is less sticky.
- You will use a lot of paint but try not to use too much on the edges of the stencil. This made the edges less crisp which was a little more visible on the smaller numbers and text.
- Take your time placing the stencil on the mat to make sure it is in the right position and that all those small pieces in the letters are in place. Step back and look at it from above.
You will love making this personalized doormat. It is an easy project and a fun way to spend some time with your son or daughter, especially if they are off to college!
Even though I am a beginner crafter, I love my Cricut. I am amazed by all of the things it can do! Take advantage of the summer sale going on at Cricut:
FREE Economy Shipping on orders $99+ to US and Canada. Use code SHIPAUG.
I would love to see what you made! Please share in the comments below.